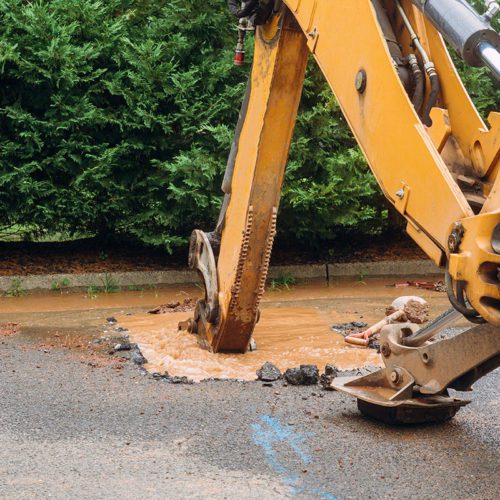
Mapping

 Video Tutorial                               Tutorial PDF

When submitting a locate request ticket via the OKIE811 Web Portal, the excavator has the option to map the dig site.  Mapping the dig site on your locate request ticket submissions will allow the OKIE811 CSR to process the ticket faster, which in return, you get your locate request confirmation number back quicker.

When submitting a locate request ticket via the OKIE811 Web Portal, the excavator has the option to map the dig site

A county must be selected to activate the map search. The map search will only include data in the county selected.  To narrow down the results more, be sure to enter a “Place” name.

To search for an address, enter the house number, prefix, street name, street type, and suffix in the corresponding fields.  Including the entire address is very important to ensure the correct location is found.   The map results should display to the right of the mapping screen.

To search for an address, enter the house number, prefix, street name, street type, and suffix in the corresponding fields.

If no address is available, the Street Name field is a required field. Enter the street name the dig site is located on into the Street Name field. Be sure to also include the prefix, street type, and suffix as applicable.

If no address is available, the Street Name field is a required field. Enter the street name the dig site is located on into the Street Name field. Be sure to also include the prefix, street type, and suffix as applicable.

If the map results do not automatically display, click “Use Ticket” located at the top right corner of the mapping screen to pull the address or street information

If the map results do not automatically display, click “Use Ticket” located at the top right corner of the mapping screen to pull the address or street information

To search for other streets, intersecting streets, highways, interstates, cities, grids and some points of interests  (such as parks, lakes, schools, churches, etc.), you can use the street search field located at the top right corner of the mapping.

To search for other streets, intersecting streets, highways, interstates, cities, grids and some points of interests  (such as parks, lakes, schools, churches, etc.), you can use the street search field located at the top right corner of the mapping

Enter the data you wish to search and hit Enter on your keyboard or select the black binoculars icon on the left side of the search field.

Helpful tips when using the street search field:  

  • When entering a street name in the street search field:  only enter the street name.  Do not include any prefix, street type, or suffix
  • When searching for Highways/Interstates: Enter “HWY” for a broad search of highways or enter the highway number such as “HWY 4”.  When searching for an Interstate, enter “I-” for a broad search of interstates or enter the interstate number such as “I-40”.
  • When searching for Grids (aka Legal description): Enter the entire grid including the range, township, section and quarter section (respectively).  Each number should include two digits, adding a “0” in front of any single digits. The range should include an East or West label and the meridian indicator; the township should include the North or South indicator.  Such as example: 05WI12N20NW
  • When searching for Points of Interests: Search by “park” or “school” for a broad search or search by the exact name of the Point of Interest.  Not all Points of Interests will be on this map. Please be sure to verify the location of the Point of Interest found.

There are several categories of search results that will display dependent on what you are searching. 

There are several categories of search results that will display dependent on what you are searching.  There are several categories of search results that will display dependent on what you are searching.

What do the search results mean?

Exact Address – finds the exact address point (may or may not have parcel information)

Parcel from Address – highlights the exact address point and the boundaries of the property (parcel)

Exact Street – Address or Exact Street Segment is not found, but a matching street name is found.

Street Begins With – Lists similar street names found, including the town selected and other towns in the county.

Intersecting – Most street results found can be expanded to view any Intersecting streets. Click on the intersecting street to locate the intersection on the map

Highways – Lists all highways in the county selected.

Cities – Lists all cities in the county selected.

Exact Street Segment – it did not find the exact address, but it found the segment of road that contains the hundred block range in which the specific address should be located.

Points of Interests – Lists any Points of Interests found based on exact or similar information you entered in the search field.  Please be sure to verify the location of the point of interest found.

Points of Interests – Lists any Points of Interests found based on exact or similar information you entered in the search field.  Please be sure to verify the location of the point of interest found.

When clicking on any of the search results, a temporary place marker is put on the map indicating the location of that search result with a black ‘X’ or red line/polygon. This temporary marking is not included on the ticket when submitted to OKIE811 for processing.

To Zoom in and out of the map, use your mouse wheel or slide the Zoom slider located at the bottom left side of the map. Please note: If using either of the two aerial layers available, move your cursor away from the copyright data at the bottom right side of the map in order to zoom in and out.

When clicking on any of the search results, a temporary place marker is put on the map indicating the location of that search result with a black ‘X’ or red line/polygon. This temporary marking is not included on the ticket when submitted to OKIE811 for processing.     To Zoom in and out of the map, use your mouse wheel or slide the Zoom slider located at the bottom left side of the map. Please note: If using either of the two aerial layers available, move your cursor away from the copyright data at the bottom right side of the map in order to zoom in and out.

The toolbar at the top of the mapping screen contains mapping tools for navigating the map and marking the dig site. 

The toolbar at the top of the mapping screen contains mapping tools for navigating the map and marking the dig site.

At the left end of the toolbar, you can view additional mapping layers by clicking on the drop-down arrow on the right side of the “Map” button. 

At the left end of the toolbar, you can view additional mapping layers by clicking on the drop-down arrow on the right side of the “Map” button.

“Map” layer – This is the default layer - The data represented here is maintained by OKIE811.

“OKIE Labeled Aerials” layer– The aerial picture belongs to Bing Maps.  All map data such as streets, address points, etc. are maintained by OKIE811. 

”Bing Labeled Aerials” – All aerial and map data represented here belongs to Bing Maps.

To enter a GPS point (latitude/longitude), click on “Enter GPS” button.  A dialogue box displays where you can enter the Latitude and Longitude values. Longitude values must be negative.  You can enter the values in Decimal Degrees, Degrees Minutes Seconds, or Degrees Minutes.  There are examples of each format for your convenience.  Degrees Minutes Seconds and Degrees Minutes formats will automatically be converted into Decimal Degrees.  Once the latitude and longitude values are entered, select “OK”.  The GPS point will be indicated by a temporary black ‘X’.

Click on “Pan” to navigate the map by clicking and dragging your mouse.

Use the “Measure” tool to measure distances on the map in miles, feet, or yards.  Single-click to start the measurement, double-click to end the measurement.

      Please note: If you are measuring distances along multiple streets or along a path, the measurement may display       a “Full” and/or “Part” distance.  “Full” indicates the total measurement you have done from start to when you             double-click to finish.  “Part” indicates the total measurement from single-click to single-click.  To avoid confusion, it            is best to complete each measurement by street.  Example:  If you want the distance between Street A and Street B, then the distance from Street B to Street C, you would first measure from Street A to Street B and double-click to end the measurement there. Then begin a new measurement from Street B to Street C.

To clear any permanent markings, temporary markings or measurements from the map, click on “Clear”. 

If you have selected a result from the search results on the right side of the mapping screen or entered a GPS, that result should be indicated by a temporary marking such as a black ‘X’ or a red line/red polygon.  Click on “Use Selection” to automatically convert that result into a permanent marking. The marking will now be orange. Dependent on what type of result, this may be an orange dot, orange polygon, or orange line. This is the marking that will be sent to OKIE811 when processing the ticket.

click use selection

orange polygon

To manually mark the dig site, use the “Mark Area” tool to draw a polygon around the dig site.  Single-click to add vertex point and double-click to complete the polygon. The marking should be orange when complete. This is the marking that will be sent to OKIE811 when processing the ticket.

To manually mark the dig site, use the “Mark Area” tool to draw a polygon around the dig site.  Single-click to add vertex point and double-click to complete the polygon. The marking should be orange when complete. This is the marking that will be sent to OKIE811 when processing the ticket.


 Back to top of page